



Ocodile Learning Toddler Tower Assembly Instructions: A Simple Guide
You've got the box open, wooden pieces spread across the floor, and a toddler circling nearby asking if it's ready yet. That's usually the moment when the paper manual starts feeling smaller than it looked five minutes ago.
I've been there. The good news is that these learning tower assembly instructions don't need to feel stressful. If you slow down at the right moments, check a few visual details, and save final tightening for the right stage, the whole build becomes much more manageable. The tower goes from a pile of parts to something solid, safe, and ready for real kitchen life.
Before You Begin Your Ocodile Tower Assembly
You are halfway to a calm build before the first screw touches the wood. A few minutes of setup now can save you from the classic assembly headache later, when two parts look correct, one screw seems off, and the frame suddenly refuses to line up.
The original assembly includes a set of wooden pieces, optional wing parts, screws, washers, and an Allen wrench. Before you start, confirm that every part is present and easy to identify. The paper manual often assumes you can tell similar hardware apart at a glance. Real life is not always that kind.

Lay out every part where you can see it
Spread the wooden pieces on a hard, flat surface and place matching parts near each other. If two side pieces are mirrored, compare their holes and edges before you begin. That small check works like matching left and right shoes. They may look close, but they do not swap well once the build starts.
Open the hardware bag right away and sort the contents into small groups. A muffin tin, two bowls, or even folded paper cups work well for this.
Try this setup:
- Wood pieces arranged by shape so mirrored parts stand out
- Short screws separated from long screws before any fastening begins
- Washers in their own pile so none get skipped
- Allen wrench set in one visible spot so it does not disappear under a panel
If a piece looks almost right, pause and compare it to the matching part on the other side of the tower. That one habit prevents a lot of unnecessary loosening later.
Set up your workspace like a small repair station
Choose a clean, level floor with enough room to turn the frame gently as you work. Soft surfaces can twist the parts just enough to make the holes look misaligned. Rugs also love to hide washers.
Good light helps more than people expect. If the pilot holes are easy to see, you are less likely to cross-thread a screw or miss that a rail is facing inward instead of outward. This guide goes beyond the paper manual for exactly that reason. The safest builds usually come from spotting visual cues early, not from forcing a part that seems close enough.
If you like reading practical setup advice from another parent-focused source, Pinwheel Crafts' parent guide has the same calm, organized tone that helps assembly feel less stressful.
It also helps to understand how the finished tower is meant to function in everyday use. Ocodile's guide to using a learning tower as a kitchen helper gives helpful context for why the platform height, rail position, and overall stability matter.
Plan for safety before the build gets interesting
Toddlers are drawn to assembly projects for all the same reasons adults get distracted by them. There are parts to sort, tools to hold, and a new piece of furniture slowly taking shape. Keep screws, washers, and the Allen wrench out of reach from the start.
If your child wants to join in, give them a safe job such as handing you large wooden pieces or helping you count panels from a short distance away. Parents who have built this tower often say the same thing afterward. The build feels easier when little helpers can watch without standing in the hardware zone.
One last tip. Do not tighten anything fully the moment it goes together. Wood furniture usually needs a little room for adjustment until the frame is square, and that is much easier to manage when every part has been identified and your workspace is under control.
Constructing the Main Tower Frame
This is the stage where the tower starts to look real. You're building the outer structure first, not chasing every screw to full tightness yet.

Start with the side panels
Place the two main side pieces so their inner faces are oriented correctly. Then attach the connecting bars or support rails one at a time. Insert each screw and turn it only enough to hold the piece in place.
That “almost tight” stage matters. Wood frames often need a little wiggle room while the next bar slides into place. If you lock the first side too tightly, the opposite side can feel stubborn even when everything is lined up correctly.
A good rhythm looks like this:
- Attach one lower connector first so the frame has a base shape.
- Add the upper connectors next to establish the tower's height and squareness.
- Check both sides visually before tightening more.
- Snug the screws gradually in an alternating pattern instead of finishing one corner at a time.
Look for visual symmetry
Step back and look at the frame from the front and both sides. The gaps should look even. The bars should sit flush rather than tilted or pinched.
If one side looks slightly higher, don't force the screw. Loosen the nearby connection a little, realign the parts by hand, and try again. That's faster than trying to muscle wood into position.
If the frame fights you, it usually means something is slightly out of alignment, not that you need more force.
Tighten in stages, not all at once
Once the frame is standing evenly, go back and tighten the fasteners more firmly. Work from one side to the other in a balanced pattern. Think “firm and secure,” not “as hard as possible.”
Over-tightening can create its own problems. Wood can bind, pieces can shift slightly, and later adjustments may feel harder than they need to. The tower should feel square and stable before you move on to the platform.
At this point, you should have a freestanding main frame that sits flat without rocking.
Installing the Adjustable Platform and Safety Rail
You can feel the project change at this point. Once the platform and rail go in, the tower starts looking less like a frame on the floor and more like the spot where your child will stand, stir, wash, and “help.”

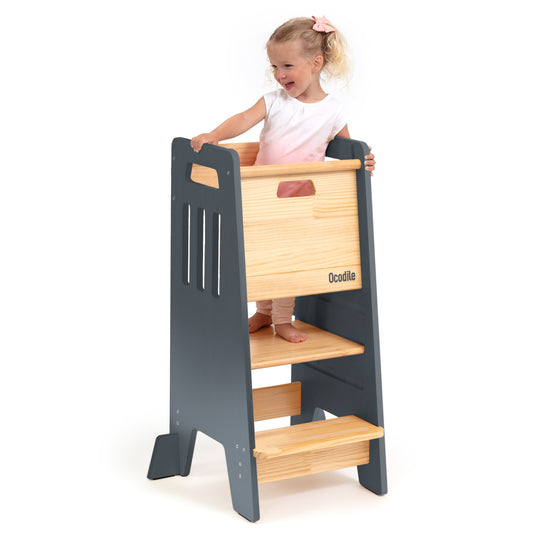
The product assembly overview shows that the original design uses a four-level adjustable system with a 12-inch safety railing perimeter. The Ocodile tower is intended for children roughly 24 months through 6 years old, with the platform and rail working together to keep the child supported while they stand at counter height. This is also the stage where small setup mistakes become easier to spot, because an uneven platform is usually visible before it becomes a real problem in use.
Choose the first platform height with your child in mind
Many parents set the platform higher than needed on day one. I understand why. You want your child to reach everything. In practice, a slightly lower setting is often the better starting point because it keeps the rail doing its job and gives your child a steadier stance.
A good first height usually looks like this:
- Your child can reach the counter with relaxed shoulders
- Their elbows bend naturally instead of lifting up high
- Their waist stays comfortably below the upper rail area
- Both feet rest flat on the platform
- Getting in and out looks calm, not scramble-y
If your child has to stretch upward and lean their chest into the rail, raise the platform one level. If they look too close to the top rail, lower it. The right fit should feel more like standing at a step than balancing on a perch.
Set the platform evenly before you secure anything
Place the platform onto the matching support points on both sides. This part works like hanging a shelf on two brackets. If one side sits a notch higher, the whole surface can look almost right while still feeling off under pressure.
Crouch so your eyes are level with the platform edges. Check left and right at the same time. The top surface should look straight, and the side gaps should match. Parents often catch mistakes here by noticing one corner sits slightly proud or one edge is not fully seated in its slot.
Before fully tightening, press down near each front corner, then each back corner. You are checking for a tiny seesaw motion. If you feel one, remove the platform and reseat it rather than forcing the hardware tighter. Tight screws cannot fix a platform that started in the wrong position.
If you want a practical way to confirm the tower still feels steady after this adjustment, these learning tower stability testing methods give a helpful at-home check.
Attach the safety rail so it guides, not squeezes
The safety rail should sit centered and flush against its contact points. Line up the rail first, start all screws loosely, and only then tighten them bit by bit. That gradual approach helps the rail settle evenly instead of pulling to one side.
Here is a simple check table to use before you call this part done:
| Check | What you want to see |
|---|---|
| Platform position | Same height on both sides |
| Rail placement | Centered, flush, and even |
| Screw seating | Hardware sits cleanly without visible gaps |
| Standing surface | No shift when you press down by hand |
One parent mistake I see often is treating the rail like a handle and pulling it inward while tightening. That can leave it slightly twisted. Let the pieces meet naturally, then snug the screws in stages.
Your child should feel held in place securely, with room to move their arms and turn comfortably.
If your model includes optional stability wings, add them only after the platform and rail are seated correctly. They can improve support, but they should never be used to hide a platform or rail that was installed out of level.
Final Safety Checks and Common Assembly Pitfalls
A learning tower often looks done a few minutes before it is ready for a child. The last review is the part that turns a finished build into a confident one.

Do a hands-on stability test
Set the tower on the floor where your child will use it most. Kitchen tile, wood, and older uneven flooring can reveal a wobble that never showed up during assembly. Put one hand on the top rail and give a light push from the front, then each side. You are not trying to shove it across the room. You are checking whether it stays planted, like a chair with all four legs resting evenly.
Then work through these checks:
- Fasteners sit snugly, with no visible space where two parts meet
- Feet contact stays even, with no corner lifting off the floor
- Platform support points stay steady when you press down and shift light weight by hand
- Pinch areas around rails and adjustment points feel smooth and clear
If you notice movement, slow down and hunt for the one spot causing it. A full round of extra tightening can hide the underlying problem for a moment, but it does not correct a part that went in slightly crooked.
Watch the base adjustment mechanism closely
One assembly area deserves extra attention. Piece K, the base adjustment mechanism, is a frequent trouble spot because a small orientation mistake can make the whole tower feel off. Analysts reviewing common assembly mistakes in this expert walkthrough on assembly errors show that many DIY builders install Piece K in the wrong direction, especially when the grooved and flat sides look similar at a glance.
Inspect Piece K twice, even if the rest of the tower looks square.
Use this visual check:
| Piece K check | Correct look |
|---|---|
| Left side | Grooves oriented correctly |
| Right side | Flat side positioned on the right |
| Connecting piece | Arch faces downward |
| Backside piece | Two-hole side faces out |
That set of details can feel fussy, but this is exactly the kind of thing a paper manual tends to rush past. Parent feedback on learning towers is pretty consistent here. Towers that wobble after “perfectly tight” assembly often have one reversed part low on the frame. Tightening only works when the parts are facing the correct direction.
If anything in that table looks flipped, redo that section before first use. It takes less time now than after you have to take half the frame apart again.
For a fuller at-home check after assembly, Ocodile's guide to learning tower stability testing methods adds a helpful routine you can do in a few minutes.
Do one final parent test
Before your child climbs in, test the tower the way a child will use it. Hold the rail, press on the standing surface, and add a gentle forward lean with your hands. Kids rarely stand still. They reach, wiggle, shift their feet, and bounce a little when they get excited.
The tower should stay square and calm under that movement. If you hear a click, feel a twist, or see one foot lift, pause and trace the issue back to the exact joint or part orientation.
One more practical habit helps after day one. A quick review of proper furniture upkeep techniques can help you spot the difference between normal wear and a hardware issue that needs attention.
Caring for Your Ocodile Learning Tower
A learning tower gets messy fast. One breakfast can leave oatmeal on the platform, syrup on the rail, and damp footprints near the base. A simple care routine keeps cleanup easy and helps you catch small wear before it turns into a repair job.
Ocodile describes the tower as made from solid wood with poplar and birch layers, finished with a lead-free, non-toxic coating. That kind of finish does best with gentle cleaning, the same way a wood dining chair lasts longer when you clean it without soaking it.
Clean it with a light hand
Start with the driest mess first. Crumbs and flour are easier to remove before you add moisture, and that keeps you from rubbing grit into the finish.
For everyday cleanup, use this order:
- Brush or wipe away dry debris first
- Use a soft cloth with mild soap and a little water
- Wipe again with a dry cloth right away
- Keep water away from screw holes, joints, and raw edges
- Skip harsh sprays or abrasive pads
If you want a broader refresher on wood furniture care, these proper furniture upkeep techniques are useful general habits to keep in mind.
One parent tip that rarely makes it into a paper manual: check the underside of the platform after sticky spills. Drips often run where you cannot see them at first, then dry into a tacky film that collects dirt.
Recheck the parts that take the most stress
Normal use loosens furniture over time. That is especially true for a tower, because children do not use it like a display shelf. They climb in, shift their weight, press on the rail, and hop down with more force than you expect.
Every so often, put a hand on these spots and check for any new movement:
- Platform fasteners
- Safety rail connections
- Base joints
- Optional wing attachments
You are looking for change. If one area feels less firm than it did last week, tighten that spot and test the tower again on a flat floor. A quiet, steady tower is usually a healthy one.
For brand-specific care advice, Ocodile's guide to toddler towers, material cleaning, and staying upright adds helpful detail on what to watch as the tower gets regular use.
Use habits that protect the frame
Try to lift the tower instead of dragging it, especially over tile seams, rough wood, or textured vinyl. Dragging puts extra strain on the feet and lower joints, much like scooting a kitchen stool over and over can loosen it before anything else does.
It also helps to give the tower a quick wipe after wet kitchen tasks, not just after obvious spills. Steam, splashes near the sink, and damp toddler hands all add up over time.
The goal is simple. Keep it clean, keep it dry, and keep an eye on the spots that work hardest. That is usually enough to keep the tower looking good and feeling solid day after day.
Frequently Asked Questions About Your New Tower
A lot of questions show up after the tower is already in use. That's normal. The first week usually reveals what the manual didn't spell out clearly enough.
How do I adjust the height as my child grows?
This is one of the biggest sticking points for parents. A review analysis for similar products found that 32% of negative feedback focused on slippage after height adjustment because re-locking steps weren't clear, according to the review-based assembly analysis PDF.
Use this slower method instead:
- Empty the tower completely. No child standing in it, no toys, no mat.
- Loosen the hardware evenly on both sides instead of fully removing one side first.
- Move the platform to the new level while checking that both sides match exactly.
- Re-seat every locking point by hand before tightening.
- Tighten side to side in turns so the platform doesn't shift off level.
- Press and wiggle test the platform before putting your child back in.
If a platform ever feels slightly slick or mobile after an adjustment, treat that as a sign to stop and re-check alignment. Don't assume it will “settle.”
Do I need the optional wing pieces?
Not always. The optional wing pieces enhance stability, but they aren't required for structural soundness in the original assembly. Some parents like using them for extra peace of mind, especially in busy kitchens or on surfaces where they want a wider footprint.
If you add them, make sure the main frame is already square and stable first. Wings should support a correct build, not mask an incorrect one.
What if the tower rocks on the floor?
First, move it to a different flat spot and test again. Floors are often less level than they look. If the rocking continues, inspect the lower frame connections and the base mechanism alignment before adjusting anything else.
When should my child stop using it?
Use depends on fit, posture, and safe movement, not just age. If your child can no longer stand comfortably within the rail setup or starts using the tower in ways it wasn't designed for, it's time to reassess.
What's the simplest long-term safety habit?
Give the tower a quick hands-on check before high-use moments like baking days, sink play, or holiday cooking. A few seconds of checking beats discovering a loose point when your child is already climbing in.
If you're comparing child-height furniture options or want a closer look at practical designs for everyday family use, Ocodile offers information on children's furniture built to support safe participation at home.