


Your Guide to the Perfect Montessori Kitchen Setup
A Montessori kitchen is simply a child-sized, accessible corner within your main kitchen that lets your toddler actually participate in making food. It’s all about low shelving, safe tools, and a sturdy learning tower that together build independence, confidence, and those all-important fine motor skills. This simple setup turns everyday chores into some of the best learning moments you can have.
From Kitchen Chaos to Calm Connection
Let’s be real, having a toddler in the kitchen can often feel like controlled chaos. Their desperate desire to "help" usually clashes with a space designed entirely for giants (a.k.a. adults), and it often ends in frustration for everyone.
But what if you could turn a small corner of your kitchen into a space that actually works for them? A spot that builds real-life skills, nurtures their independence, and, most importantly, deepens your connection. This is the entire point of a Montessori-inspired kitchen.
This isn’t about creating some trendy, Instagram-perfect play kitchen. It's about applying a philosophy of empowerment to the heart of your home. The goal is to create what Maria Montessori called a “prepared environment.” This just means thoughtfully setting up a space so your child can safely and confidently join in on real tasks.
The Power of a Prepared Environment
A prepared environment in the kitchen gets rid of the obstacles that usually keep toddlers out. It’s an open invitation for them to participate. Instead of having to ask you for every single cup or snack, your child can grab their own things from low, open shelves.
Rather than being underfoot and out of sight, they can be brought right up to the counter with a stable learning tower.
The real magic of Montessori is fostering independence by giving them a world they can actually navigate. By creating a child-centered space with real, purposeful activities, you’re nurturing your child as a whole person, not just keeping them busy.
This kind of setup has some incredible, tangible benefits:
- Builds Independence: Kids learn to get their own water, find their own snacks, and help with cleanup, which builds true self-reliance.
- Refines Fine Motor Skills: Activities like pouring, scooping, and slicing with a child-safe knife are fantastic for strengthening hand-eye coordination.
- Boosts Confidence: Having a real role in preparing the family meal gives a child a powerful sense of belonging and accomplishment.
- Promotes Healthy Eating: It's a well-known secret: kids who help make the food are way more likely to actually eat it.
Ultimately, a Montessori kitchen shifts the dynamic from you managing a child to you mentoring one. It can transform stressful meal prep into a shared activity.
A thoughtfully designed piece of furniture, like a stable and secure Ocodile standing tower, becomes the bridge that lets your child join you safely in the heart of the home.
Here's a quick look at how the different parts of a Montessori kitchen come together.
Montessori Kitchen Setup at a Glance
| Component | Purpose | Key Benefit |
|---|---|---|
| Learning Tower | To safely elevate a child to counter height. | Allows participation in real kitchen tasks like washing and mixing. |
| Low Shelves/Cabinets | To store child-accessible dishes, utensils, and snacks. | Promotes independence in self-serving and cleanup. |
| Child-Sized Tools | To provide safe, functional tools for food prep. | Develops fine motor skills and practical life skills. |
| Small Table & Chair | To offer a dedicated space for eating or food prep. | Encourages focus and proper eating habits. |
| Water & Snack Station | To allow independent access to water and healthy snacks. | Builds self-regulation and healthy habits. |
This table shows how each element is intentionally chosen to support your child's growth, turning your kitchen into a rich learning environment.
Designing Your Child's Kitchen Zone
Alright, let's get into the nitty-gritty of setting up your child's kitchen zone. The first thing to tackle is finding the perfect spot. And don't worry, you don’t need a massive, magazine-worthy kitchen for this. A dedicated corner in even a small space can work wonders for a montessori kitchen setup. The real goal is to create a functional, child-sized area that feels like a natural part of your family’s daily rhythm.
Thinking about the big picture can be a huge help here. If you're already considering a larger project, digging into how to plan a kitchen remodel can give you a solid foundation. It helps you see how your child’s area will fit into the overall workflow, making sure everything coexists peacefully.
Location and Layout Fundamentals
When you're scouting for a location, safety and accessibility are everything. You'll want to find a low-traffic spot, well away from the main oven, stove, and the general hustle and bustle of the kitchen. A quiet corner or a slice of countertop you can dedicate just for them is perfect, especially if you have a sturdy learning tower to give them a boost.
Try to see the space from their height. Can they easily move from their little shelf to their work table without causing a traffic jam? You're aiming for an uncluttered, inviting area that practically whispers, "This space is for you."
This little diagram really captures the heart of what we're trying to do—move from the typical kitchen chaos to a space built on preparation and connection.

As you can see, a thoughtfully prepared environment is the bridge from chaos to connection, turning the kitchen into a place for partnership, not just parallel activities.
Shelving and Work Surfaces
Low, open shelving is the absolute cornerstone of a Montessori kitchen space. This is where your child will find their own dishes, cups, and utensils. Trust me, this simple change is a game-changer. It empowers them to set their own spot at the table, grab a drink of water, or even help put away the clean dishes.
This isn’t a new idea. Montessori classrooms have always prioritized real food prep over toy kitchens. By setting up child-sized shelves at 24-30 inches high, even a two-year-old can independently reach 100% of their plates and utensils. This simple shift can slash parental interruptions by up to 50% because kids are finally empowered to do things for themselves.
A small table and chair, or even just a designated floor mat, gives them a personal workstation. This becomes their spot for snacking, "chopping" a soft banana with a kid-safe knife, or just concentrating on pouring water from one small pitcher to another.
Key Takeaway: The goal isn't just to shrink things down; it's to make the entire environment accessible. Accessibility is what truly builds independence.
Real-World Layout Ideas
Your kitchen’s footprint will naturally guide your layout, but the core principles don't change.
- For Compact Kitchens: A single low cabinet or a rolling cart works beautifully. A cart is fantastic because it can hold all their supplies and be wheeled out of the way when you need the space.
- For Larger Kitchens: You might be able to dedicate a whole bank of lower cabinets. We took one cabinet door off its hinges to create instant open shelving and placed their small table right next to it to clearly define the zone.
No matter the size of your space, the focus is on creating an area that feels like a genuine part of the kitchen, not an isolated playpen. This setup isn’t about chasing a picture-perfect look for social media; it’s about building a practical, functional space that truly works for your family.
Choosing the Right Tools for Little Hands
Once you’ve carved out a space, it's time for the fun part: picking out the tools your child can actually use. This isn't about buying miniature, toy-like replicas. It’s about finding functional, safe, and perfectly sized items that truly empower your little one in the kitchen.
The tools you choose for an 18-month-old will look a lot different from what a 3-year-old can handle. For the youngest toddlers, think simple, one-step actions. Small pitchers for pouring water, a soft brush for scrubbing potatoes, and sturdy, unbreakable bowls are a great place to start.

As your child grows, their skills will blossom, and their toolbox should, too. A 3-year-old might be ready for more complex tasks, like using a wavy chopper to slice a banana or a special nylon knife for soft cheese. The trick is to introduce one new tool at a time, showing them how to use it slowly and clearly.
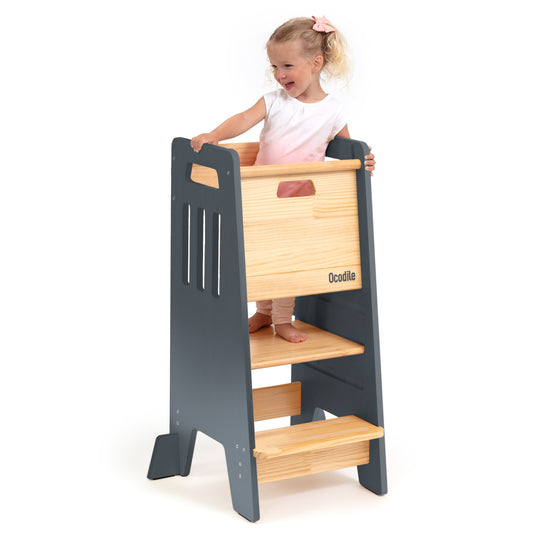
The Learning Tower: A Kitchen Game-Changer
Of all the things we brought into our kitchen, the learning tower was the absolute game-changer. Before we got one, my toddler was either clinging to my legs, totally frustrated, or trying to balance on a wobbly dining chair. A well-designed learning tower solves this problem instantly and safely.
It’s so much more than a stool. It’s a secure platform that brings your child right up to the counter, making them a true partner in whatever you’re doing. Studies have shown that when kids can safely participate in about 80% of daily tasks like stirring or washing veggies, their motor skills can develop up to 25% faster. Ocodile’s standing towers are a perfect example of designs that blend this essential safety with a style that fits right into your home, turning chaotic mornings into sweet bonding moments.
When picking a tower, stability is everything. You need one with a wide, solid base that won’t tip over and safety rails that keep your child securely inside. It gives you the peace of mind to actually guide their learning instead of constantly worrying about a fall. For a more detailed breakdown, you might find it helpful to read our guide to choosing the best kitchen helper.
Essential Tools for Young Chefs
Besides the learning tower, a few key tools will make your child’s time in the kitchen both fun and meaningful. The best approach is to start simple and gradually add more.
- Small, Lightweight Pitcher: This is perfect for practicing pouring, which is a foundational kitchen skill. You can start with dry goods like beans and then move on to water.
- Child-Safe Knives: Look for a nylon knife or a crinkle cutter. They're ideal for slicing soft foods like bananas, avocados, and cucumbers, giving your child real cutting practice without the risk of a sharp blade.
- Miniature Utensils: Small whisks, spatulas, and wooden spoons that fit comfortably in little hands make tasks like stirring and scooping feel manageable and fun.
- Small Bowls and Sponges: Having their own set for washing produce or cleaning up little spills gives them a sense of ownership over the entire process, from start to finish.
We started with just a small pitcher and two cups. The endless pouring practice built my son's concentration and coordination, and it was a simple, low-mess activity that he absolutely loved.
Remember, every real tool you introduce is a chance to teach responsibility and respect. When you provide functional items, you’re showing your child that you trust their growing abilities.
Making Safety a Natural Part of the Kitchen
Let's be honest, the idea of a toddler loose in the kitchen can make any parent's heart skip a beat. We see sharp corners, hot surfaces, and a million other potential mishaps. But a Montessori kitchen isn't just about slapping on cabinet locks and calling it a day. It’s about creating an environment where safety and capability grow hand-in-hand.
Instead of a constant stream of "No!" or "Don't touch that!", the focus shifts to showing them how. You demonstrate carrying a small glass with two hands. You supervise as they use a child-safe knife to slice a banana. This approach teaches them to respect their environment, not to be afraid of it.
Of course, you still need the basics. For a comprehensive look at the essentials, our guide on how to childproof your home is a fantastic starting point for the whole house.
Building Skills Instead of Walls
At its core, the Montessori method is about trusting the child. When you hand them a child-safe tool, you're not just giving them an object; you're giving them a lesson in responsibility. This process of showing, guiding, and supervising is what turns the kitchen from a no-go zone into a space for real learning.
The safest kitchen is one where your child understands boundaries and respects the tools they are given. Competence becomes the best childproofing.
And it really works. Guided kitchen activities are a powerhouse for development. Fine motor skills can improve by a staggering 30-40% through simple tasks like pouring and chopping. In a well-prepared environment, you'll see around 70% of toddlers mastering these skills by the time they're 2.5 years old.
Furniture That Gives You Peace of Mind
Teaching skills is one thing, but having fundamentally safe furniture is non-negotiable. Let’s face it, a wobbly dining chair pushed up to the counter is an accident waiting to happen. It's stressful for you and unsafe for them.
This is where a well-designed learning tower becomes your best friend. A proper tower offers a secure, stable platform, practically eliminating the risk of tipping. It was with this exact problem in mind that Ocodile was founded in 2021—to help kids safely join in on up to 90% of family cooking activities. A stable design can reduce common kitchen falls by as much as 75%.
When you aren't constantly hovering and worrying about a fall, you can actually relax. That peace of mind lets you focus on what truly matters: connecting with your child and enjoying your time together in the kitchen.
Bringing Your Montessori Kitchen to Life with Daily Activities

So you’ve created the perfect montessori kitchen setup. The low shelves are ready, the learning tower is in place, and everything is perfectly organized. Now what? This is where the real magic begins. That space isn’t a museum exhibit; it's a hands-on workshop, and the best way to get started is by simply inviting your child into your everyday kitchen life.
These invitations don't have to be a big production. It can be as simple as, "Hey, want to help wash the strawberries for our snack?" As they stand securely in their tower, focused on rinsing each berry, you're seeing more than just help. You're witnessing deep concentration, the strengthening of fine motor skills, and an early lesson in how things happen in a sequence.
Integrating Activities into Your Daily Flow
The secret is to weave these learning moments into your natural routine, not to force them into a scheduled "activity time." Take a look at the small tasks you already do and think about where your child can fit in. This makes their participation feel completely normal—just part of being in the family.
Pay attention to what they’re already curious about. If they’re fascinated by water, a simple washing station is a huge win. If they love stirring and mixing, give them a little bowl and a whisk while you get dinner ready.
The most impactful activities aren't complicated; they are the real, purposeful tasks of everyday life. By inviting children to contribute, you show them they are valued and capable members of the family.
To really get the most out of your setup, look for opportunities to practice fun fine motor activities that pop up naturally. All that stirring, pouring, and scooping builds the foundation for both kitchen skills and cognitive growth.
Age-Appropriate Kitchen Tasks
Children are far more capable than we often give them credit for, especially when we set them up for success. Matching the task to their developmental stage is key to building their confidence.
For Toddlers (18 months - 3 years):
- Washing Produce: This is a simple, satisfying job. Put a colander in the sink and let them go to town scrubbing soft veggies with a small brush.
- Pouring Ingredients: Start them off with dry ingredients like oats or flour. As their control gets better, you can introduce liquids.
- Stirring and Mixing: Give them a small bowl with a bit of pancake batter or salad dressing and let them stir.
- Spreading: A child-safe butter knife and some soft cream cheese on a cracker is fantastic practice.
For Preschoolers (3 - 5 years):
- Slicing Soft Foods: With a nylon knife or a crinkle cutter, they can safely slice things like bananas, cucumbers, or hard-boiled eggs.
- Measuring Ingredients: Now’s a great time to introduce simple measuring cups and spoons.
- Setting the Table: Task them with grabbing their own placemat, plate, and cup from their accessible shelf.
- Peeling: Oranges and hard-boiled eggs are perfect for little fingers learning the motions of peeling.
These aren't just chores; they are foundational Montessori practical life activities. Each one is a mini-lesson in patience, coordination, and following steps.
My best advice? Always model the activity slowly and without talking first. Then, step back. Let them try, let them make a mess, and let them figure it out at their own speed. The real learning happens in the process, not in the perfect outcome.
Common Questions About Montessori Kitchens
Even after you've decided to create a Montessori kitchen setup, a few questions are bound to pop up. It's totally normal to second-guess the details, from the budget to safety and whether you’re getting it "right." Let's walk through some of the most common worries we hear from parents.
One of the biggest hurdles is often the perceived cost. Do you need a huge budget? The honest answer is no, not at all. You can get started by simply clearing out a low drawer for your child’s things and picking up a few inexpensive, kid-safe utensils.
The whole point is making things accessible, not undertaking a full-blown kitchen remodel. See what you can adapt in your current space before you feel pressured to buy brand-new everything. Often, a simple and sturdy step stool works just as well as a learning tower when you're just starting out.
But Is It Really Safe for a Toddler to Use Knives?
This is probably the number one concern, and it’s a completely fair question. The secret isn't avoiding knives altogether; it's about giving them the right tools and always being right there with them. Montessori-friendly "knives" are not sharp in the way an adult's knife is.
- Wavy Choppers: These have a dull, crinkled edge that can slice through soft foods like a banana or avocado but won't easily cut skin.
- Nylon Knives: Made from hard plastic with a serrated edge, these are perfect for toddlers who are just learning the sawing motion of cutting.
It’s less about the tool itself and more about how you introduce it. Always show them how to use it safely, guide their hands with yours at first, and make it a "together" activity. This builds respect for tools and establishes safety habits from day one.
The goal isn’t to eliminate all risk but to teach your child how to manage it responsibly. You're building competence, which is the most effective form of safety.
What if My Child Just Makes a Huge Mess?
Oh, they will. Let's be real—a mess is an unavoidable and absolutely essential part of learning. Spills, drips, and dropped bits of food aren't failures. They are golden opportunities for your child to learn.
When a spill happens, try to resist that parental urge to swoop in and clean it up yourself. Instead, take a breath and calmly say, "Uh oh, some water spilled. Let’s get a sponge and wipe it up."
By getting them involved in the cleanup, you teach an incredibly valuable life lesson: we are all responsible for cleaning up our own messes. Keep a small dustpan, brush, and a few sponges in a spot they can easily reach. This way, they can own the entire process, from prep all the way to cleanup, turning a potential frustration into a moment of practical learning in your Montessori kitchen setup.
At Ocodile, we believe that providing safe, beautiful, and functional furniture is the first step in inviting your child to learn alongside you. Our standing towers and step stools are designed with your child's independence and your peace of mind at their core. Explore our collection and find the perfect piece to bring your family closer in the kitchen.