


How to Baby Proof Furniture A Complete Guide
The shift happens fast. One week your baby is happy to stay on a blanket with a few toys. The next, they’re rolling toward the coffee table, reaching for a lamp cord, and testing whether a bookshelf shelf works like a ladder rung.
That’s when furniture stops being background and starts becoming part of your safety plan.
Learning how to baby proof furniture isn’t about wrapping your whole home in foam or giving up on having a space that feels calm and beautiful. It’s about knowing which hazards matter most at each stage of development, fixing the high-risk problems first, and creating a home where your child can move, explore, and grow with fewer hard no’s.
Your Home Through Your Baby's Eyes
Mobility changes everything. A newborn mostly stays where you place them. A crawler doesn't. A baby who’s pulling up uses furniture the way an adult uses a handrail, a balance bar, and a climbing frame all at once.
That’s why the safest approach starts with development, not décor. You don’t baby proof furniture for the child you had last month. You baby proof for the skills your child is about to discover.
The moment furniture becomes a hazard
The first crawl feels exciting until you notice what your baby notices. The edge of the TV stand is now face-height. The side table has a tempting cord. The dresser drawers look like steps. Even a stable-looking piece can become dangerous once a child pulls, hangs, or climbs.
This isn’t overthinking. An estimated 6,400 children under age 18 experience emergency department-treated tip-over injuries annually involving furniture, and 48% of surveyed parents report they have not secured televisions and furniture to prevent tipping over, according to baby proofing market data summarized here.
Practical rule: If a piece of furniture would seriously injure your child if it fell, treat anchoring it as mandatory, not optional.
The emotional trap is familiar. Parents handle the obvious things first, outlet covers, cabinet latches, gates, then assume the furniture can wait. In real homes, furniture often gets delayed because anchoring feels technical, corner guards feel ugly, and no one wants to drill into walls without a clear plan.
Safety and style can live together
That tension is real. Most families don’t want a living room that looks temporary for years. They want safety measures that work, and they want a home that still feels like theirs.
There’s also a gap in the usual advice. Many baby proofing guides tell you what to buy, but not how to make those choices work with your layout, routines, and design preferences. For parents who care about both child development and aesthetics, that matters.
A good setup does three things at once:
- Reduces serious injury risk by securing heavy furniture and unstable items
- Softens everyday impact points where bumps and falls happen
- Preserves a usable, attractive home so safety solutions stay in place instead of getting removed out of frustration
When parents approach furniture this way, they usually end up with something better than a patched-together fix. They create a home that says yes more often. Yes, you can crawl here. Yes, you can pull up here. Yes, you can participate without every object becoming a hazard.
Preparing for a Safer Home Your Toolkit and Mindset
Before you install anything, gather the right tools and look at the room from floor level. Most furniture safety mistakes happen in the planning stage. Parents buy the wrong anchor kit, stick corner guards to dusty surfaces, or miss the item that’s most likely to be grabbed first.
A better approach is simple. Build a small toolkit, then inspect each room the way a mobile baby will experience it.
Baby Proofing Essentials Checklist
| Item | Primary Use | Pro Tip |
|---|---|---|
| Stud finder | Locating wall studs for anchors | Test it on a known stud first so you trust the reading |
| Drill or screwdriver | Installing anti-tip hardware | Keep the correct bit size nearby before you start |
| Anti-tip furniture straps or brackets | Securing dressers, bookcases, and cabinets | Match the hardware to both the furniture and wall type |
| Measuring tape | Checking spacing and placement | Measure twice before drilling into finished walls |
| Pencil | Marking stud and screw points | Mark lightly so you can erase after installation |
| Corner guards | Cushioning sharp corners | Clear silicone usually looks cleaner than bulky foam |
| Edge bumpers | Softening long hard edges | Use them on coffee tables and media units children pass often |
| Cleaning cloth | Prepping surfaces for adhesives | Adhesive products fail fast on dusty or oily finishes |
| Cable ties or cord organizers | Managing reachable cords | Shorten slack instead of just pushing cords behind furniture |
| Level | Checking furniture sits flat | A wobbly piece should be stabilized before anchoring |
Start at floor level
Get down on your hands and knees and move through the room slowly. That one step changes what you notice. You’ll see the underside of table corners, dangling cords behind a lamp table, handles that invite pulling, and low shelves that create easy footholds.
Focus on reach, strength, and repetition. Babies don’t interact with furniture once. They test the same object again and again until they learn what moves.
A useful way to frame the room is to ask:
- What can be pulled?
- What can be climbed?
- What can be bumped head-first?
- What can become reachable after one new skill appears?
A room is safer when your child has a few things they’re allowed to use freely, instead of many things they’re constantly being redirected away from.
Build a yes space, not just a no list
A Montessori-aligned mindset is helpful. The goal isn’t to stop movement. It’s to shape the environment so movement is safer and more purposeful.
That might mean moving a fragile side table out of the play zone, keeping one sturdy low shelf available for independent access, or choosing furniture that supports participation instead of tempting risky climbing. If you want a broader room-by-room framework, Ocodile’s guide on how to childproof your home is a useful companion to furniture-specific planning.
The mindset matters as much as the hardware. If a room constantly asks a baby to resist temptation, the room usually loses.
The Foundation of Safety Anchoring Heavy Furniture
The most important furniture safety job in any home is anchoring heavy pieces so they can’t tip forward. Dressers, bookcases, cabinets, shelving units, and freestanding TVs all deserve attention. Some look stable until a child opens drawers, pulls on a shelf, or uses the frame to stand.
The timing matters too. The optimal implementation window for anchoring furniture is between 6 to 10 months of age, when babies move from rolling to crawling and begin pulling up, and this is described as a primary childproofing priority in Consumer Reports' babyproofing guidance.
A quick visual helps before you start drilling.

Why furniture tips in the first place
Most tip-overs happen because the center of weight shifts forward. Open drawers make that worse. So does climbing, hanging, or pulling. Tall narrow pieces are particularly risky, but lower items can also become unstable if they’re top-heavy or placed on uneven floors.
Anchoring works because it stops that forward rotation. The strap or bracket doesn’t make the furniture stronger. It keeps the piece connected to the structure of the home so a child’s force can’t pull it over.
If you’ve recently moved, recheck every anchor. Furniture is often detached during a move and never reinstalled. Families using professional help for setup or relocation often pair the move with a fresh safety reset, and that’s one reason some parents coordinate with reliable Perth furniture movers or a local equivalent when heavy items need to be placed carefully before re-anchoring.
The basic installation sequence
Use the manufacturer’s anti-tip kit if it’s solid and complete. If it isn’t, buy a hardware-mounted anti-tip strap kit designed for your furniture type.
Follow this sequence:
- Choose the piece first. Start with dressers, bookcases, media units, and any cabinet a child can reach.
- Find the stud. Use a stud finder and mark the center of the stud with pencil.
- Position the furniture. Push it into its final location before drilling.
- Attach hardware to the furniture. Install the bracket or strap point where the material is strongest, usually solid wood framing at the top rear.
- Attach hardware to the wall stud. Don’t rely only on drywall unless the hardware specifically supports your wall condition and load needs.
- Tighten and test. The piece should sit close to the wall with limited forward movement.
Here’s a useful demonstration to watch before you tackle your own setup.
Use hardware that connects to a wall stud whenever possible. Anchors are only as strong as the material holding them.
What changes by furniture type
Dressers need special attention because drawers create built-in steps. Anchor the top of the frame, not the drawer slides or thin back panel. Keep heavier items in lower drawers so the unit stays less top-heavy in daily use.
Bookcases and shelving units should be secured at the top rail or another structurally strong point. If the shelves are adjustable, don’t assume the upper portion is reinforced. Test for wobble before and after installation.
TV stands and freestanding televisions create two hazards, the furniture and the screen. If the TV isn’t wall-mounted, secure both the stand and the television itself using the appropriate hardware.
Cabinets in play areas can be deceptive. If a child can open one side and lean on the door, they can change the balance quickly. Tall storage pieces need the same treatment as bookshelves.
For families who want a more detailed room-by-room walkthrough, Ocodile has a practical guide on how to secure furniture to a wall.
What doesn’t work well
Some fixes feel reassuring but fail in practice.
- Adhesive-only anti-tip products can be useful in limited situations, but they’re not my first choice for heavy furniture.
- Attaching to thin backing panels often tears out under force.
- Securing one item and ignoring the one next to it leaves a gap in the room’s safety logic.
- Waiting until climbing starts is too late. Pulling up and bouncing against furniture is enough to create risk.
The strongest baby proofing decisions are usually the least visible once installed. That’s the sweet spot. High protection, low visual clutter.
Softening the World Protecting Against Bumps and Falls
Not every furniture injury comes from a dramatic event. Most families deal more often with forehead bumps, mouth-height table edges, and falls into hard corners during early standing and cruising. These are the injuries that happen in normal daily motion, often in the exact room where you spend the most time.
That calls for a layered fix. A multi-faceted approach to baby proofing involves applying corner guards and edge bumpers made of durable silicone or foam, while also choosing furniture with non-toxic finishes and rounded or curved edges as described in this baby proofing guide from Rocky Mountain Children's Health Foundation.

Choose protectors you’ll keep on
The best corner guard is the one that stays attached and doesn’t make you hate the look of the room. That usually means choosing between clear silicone and foam.
- Clear silicone looks subtler on wood, stone, and darker furniture. It’s a good fit for living rooms where appearance matters.
- Foam gives more visible cushioning and can be useful on very sharp edges or fireplace surrounds, but it’s bulkier and easier for some toddlers to peel.
Before applying anything, clean and fully dry the surface. Adhesive products fail quickly on dusty varnish, oil-finished wood, or textured laminate. Press firmly, then leave it alone long enough to bond properly.
Where padding helps most
You don’t need to pad every edge in the house. Focus on places where babies fall during transitions, not just where adults think something looks sharp.
Priority areas usually include:
- Coffee tables and side tables in active living spaces
- TV units and low consoles at forehead height for crawlers and early walkers
- Open shelving corners near play zones
- Fireplace edges or hearths if they’re in the main family room
A softer landing underfoot helps too. In high-traffic play areas, a cushioned floor surface can reduce the sting of everyday tumbles. Parents setting up a safer movement zone often pair furniture changes with a foam play mat guide to make cruising and early walking more forgiving.
The safest furniture often starts with what you buy, not what you add later.
Think beyond padding
Padding is a fix. Smarter furniture selection is prevention.
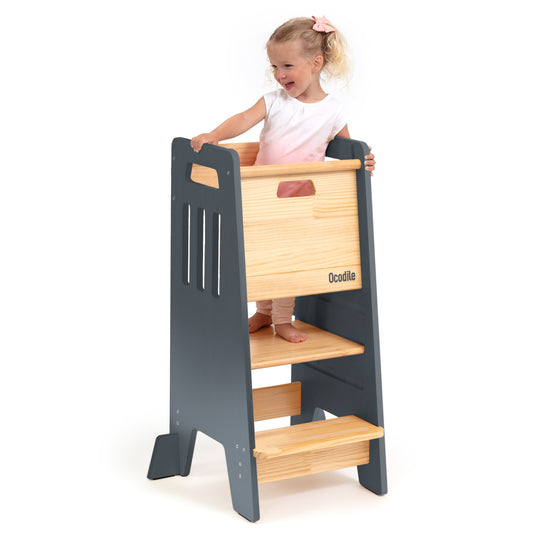
When you’re replacing or adding pieces, look for rounded edges, stable bases, easy-to-clean surfaces, and finishes you’re comfortable having in a child’s daily environment. That’s also where one well-designed child-access item can reduce risk elsewhere. For example, an Ocodile step stool is designed to support child participation at adult-height surfaces, which can help families avoid improvising with unstable chairs or decorative stools.
That’s the longer-term principle behind how to baby proof furniture well. Add protection where you need it now, but buy future pieces that need less correction from the start.
Securing Everyday Objects and Unstable Items
Some of the most frustrating hazards aren’t the obvious big pieces. They’re the ordinary objects that become dangerous only when a child starts using them in an unexpected way. A floor lamp turns into a pull toy. A stool becomes a launch point. A table runner becomes a handle for everything sitting on top.
Those are the details that decide whether a room feels constantly stressful or calmly manageable.

The objects parents forget first
A common scene looks like this. A baby pulls to standing using the sofa, spots the floor lamp beside it, grabs the pole, and discovers it moves. The lamp didn’t seem dangerous because it wasn’t heavy like a dresser. But it was tall, unstable, and easy to yank.
The same logic applies to:
- Floor lamps and standing lights that can sway or fall
- Decorative plant stands or vases that wobble with one push
- Coat racks that become climbing frames
- Corded electronics where one tug pulls down the object above
If an item is tall, narrow, or top-weighted, either secure it, relocate it, or remove it from the child’s main zone. Decorative value doesn’t outweigh repeated risk in a room used every day.
Tables invite pulling before climbing
Tables create two kinds of problems. First, they give toddlers a surface to steady themselves on. Second, they display tempting objects above eye level, which teaches children to pull.
I’ve seen parents solve this effectively by changing what lives on the table, not just the table itself. Heavy ceramic lamps, glass bowls, candles, and trailing runners tend to disappear from family rooms for a while. The room still looks finished. It just relies less on unstable tabletop styling.
A few better swaps:
- Use placemats instead of runners in reachable areas
- Keep breakables off low side tables
- Choose tables with rounded corners and solid bases
- Avoid lightweight nesting tables in active play paths
Beds, stools, and furniture that supports independence
Not all child-access furniture is a problem. Some of it is part of a safe, developmentally supportive home. The difference is stability, supervision, and placement.
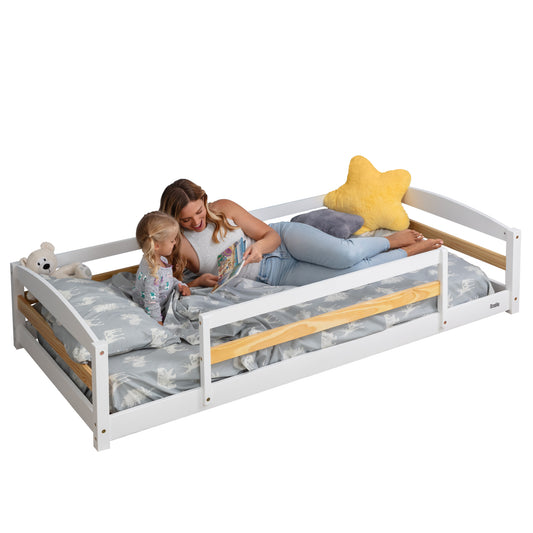
A floor bed can reduce the hazard of climbing down from height, but the surrounding room still needs to be managed. Keep hard-edged furniture away from the sleep and wake path. Avoid nearby cords, unstable décor, and climbable shelving.
Step stools and standing towers deserve similar judgment. A sturdy, purpose-built stool can help a child wash hands or join you at a counter. A wobbly dining chair pushed to the sink usually creates a worse setup. The question isn’t whether a child should participate. It’s whether the object they’re using was meant for that job.
Give children safe ways to do what they want to do, and you’ll spend less time stopping unsafe versions of the same behavior.
Blind cords and charging cables
Cords are part of furniture safety because furniture often hides them until a child finds them. Secure blind cords high and out of reach. Bundle excess charging cable length. Don’t let a lamp, sound machine, or monitor cord drape where a child can grab it from the floor or a bed.
The simplest rule is the one that works. If a child can see the cord, assume they’ll test it.
Ongoing Safety Checks and When to Call a Professional
Baby proofing furniture isn't a one-and-done task. Children change faster than rooms do. A setup that worked for a crawler may fail for a toddler who can drag a stool, open a drawer, and reach a higher shelf in the same afternoon.
That’s why maintenance matters. Safety hardware loosens. Adhesives wear out. Furniture gets rearranged. New gifts arrive and old assumptions stop matching your child’s abilities.
A simple rhythm for rechecking
Use a short recurring checklist instead of waiting until something looks wrong.
Monthly, check:
- Anchor tension on dressers, bookcases, and cabinets
- Corner guard adhesion on frequently bumped pieces
- Furniture wobble after cleaning, moving rugs, or rearranging
- Cord position around lamps, monitors, and chargers
A few times a year, step back and reassess the room itself:
- What can my child reach now that they couldn’t reach before?
- What are they trying to climb lately?
- What did we add to the room without thinking about safety?
When professional help makes sense
There’s no prize for doing every part of this alone. Some homes are straightforward. Others aren’t. Plaster walls, masonry, unusual furniture construction, rental restrictions, large built-ins, and complex layouts can make DIY baby proofing harder.
There are over 20,000 qualified childproofing professionals in the United States and Canada who can help with complex installations or full home assessments, according to the Consumer Product Safety Commission's annual tip-over report.
Call a professional if:
- You can’t confidently locate or use studs
- Your walls require specialized hardware
- A furniture piece is unusually heavy, antique, or awkward
- You want a whole-home plan instead of room-by-room guesswork
Parents sometimes frame this as overkill. It isn’t. It’s the same as hiring help for electrical work you don’t want to improvise. Smart safety decisions often look boring, and that’s usually a good sign.
Frequently Asked Questions About Baby Proofing Furniture
How do I baby proof furniture in a rental without damaging the walls
Start by asking your landlord what’s permitted. Many rentals allow small holes that can be patched later. If wall drilling is limited, focus first on layout changes, removing high-risk unstable pieces from the child’s zone, and using the most secure approved hardware you can. For heavy tip-risk furniture, a less attractive room is better than an unsafe one.
What should I do with antique or heirloom furniture
Be more cautious, not less. Older furniture can be beautiful but structurally unpredictable. Thin backs, brittle joints, and delicate veneers don’t always tolerate standard installation points well. If you don’t want to drill into the piece, move it out of active child areas or use professional advice to find a safer anchoring method.
Do I need to secure low heavy furniture too
Sometimes, yes. Height alone doesn’t determine risk. If the piece can shift, has drawers, sits on a slippery surface, or tempts climbing, it deserves a closer look. Test how it behaves when drawers are opened and gentle forward force is applied.
Are corner guards enough to make a table safe
No. Corner guards help reduce bump injuries, but they don’t fix instability, dangerous placement, or climbable design. Think of them as impact reduction, not total protection.
When should I start baby proofing furniture
Start before your baby is fully mobile. Once rolling turns into determined movement, the timeline compresses fast. It’s much easier to install anchors and rethink layout before you’re chasing a child away from hazards every few minutes.
Can I keep a stylish home while baby proofing
Yes, but it takes selectivity. Choose discreet hardware, reduce visual clutter, and prioritize furniture that already has stable proportions and softer edges. A calmer room usually ends up being both safer and better looking because there are fewer fragile, tippy, or unnecessary pieces competing for space.
If you want furniture that supports independence while fitting into a thoughtful family home, explore Ocodile. Their approach centers on child-friendly design, practical everyday use, and pieces that help families build safer spaces without giving up on aesthetics.